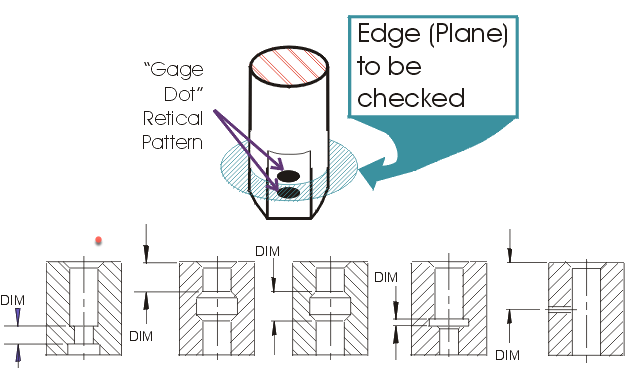
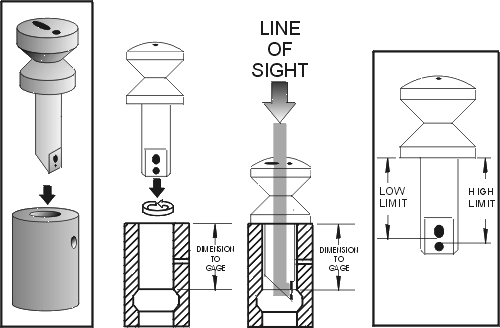
SIGHT-PIPE DEPTH GAGES provide a practical method for visually inspecting hard to gage depth dimensions in machined bores or cavities. Each Depth Gage has a Gage Dot pattern for the tolerance of the specific application.
The gap between the inner edges of the Gage Dots is equal to the tolerance zone of the characteristic being inspected
When the SIGHT-PIPE Depth Gage is inserted into the piece part, a magnified image of the two Gage Dots, and the edge of the characteristic being inspected is projected to the top of the enlarged head of the SIGHT-PIPE . The characteristic being inspected is in tolerance when it is viewed tangent to, or passing between, the Gage Dots. It would be out of tolerance if it was viewed as passing through either of the Gage Dots.
The characteristic being inspected is in tolerance when it is viewed tangent to, or passing between, the Gage Dots. It would be out of tolerance if it was viewed as passing through either of the Gage Dots.
Depth Gage Styles
There are many styles of SIGHT-PIPE Depth Gages available. Depth Gages are designed and manufactured for each specific application:
– Style A – for tolerances as small as+/- .010″
– stocked SIGHT-PIPESÒ have custom Gage Dots added.
New Modular Style with "built-in" LED & magnification
– High Accuracy Style, for tolerances as small as +/- .001 – with various options for lighting, magnification and hard-coated aluminum gage protection
Misc. and Accessories
Depth Gages


Depth Gages for Visual Inspections